
Imagine spending an entire weekend scrubbing your bathroom floor only to watch the grout turn a muddy grey again after just one damp Pacific Northwest week. It's a common frustration for homeowners who realize that beautiful tile is only as good as the grout holding it together. You want your kitchen and bath to stay healthy and bright, but the fear of choosing the wrong product or leaving a sticky residue on your expensive tile often leads to paralysis. We understand that your home is your sanctuary, and protecting it from the moisture-heavy climate of our region requires more than just a quick wipe down.
Successful grout sealant application isn't just about wiping on a liquid; it's about microscopic preparation and moisture control. You're likely looking for a way to stop stains before they start, and this guide provides the professional steps to achieve that water-beading protection you see in high-end renovations. We'll show you how to navigate the shift toward eco-friendly, penetrating sealers which now make up over 61% of the market. By the end of this article, you'll have the confidence to apply sealer like a seasoned veteran, ensuring your tile surfaces look brand new while staying compliant with the latest 2021 Washington State Building Code standards.
Key Takeaways
- Understand how a penetrating barrier serves as your home's first line of defense against deep-seated stains and structural moisture damage.
- Learn the precise steps for a successful grout sealant application, starting with the critical bone-dry preparation phase required for professional results.
- Compare different applicator tools to find the most efficient method for your specific tile layout, ensuring even coverage without leaving residue.
- Master the "Water Drop Test" to accurately monitor your sealant’s performance and determine exactly when it's time for a refresh.
- Discover how to maintain your sparkling surfaces using safe cleaning practices that protect both your family’s health and the sealant’s protective layer.
Why Grout Sealant Application is Essential for Your Home
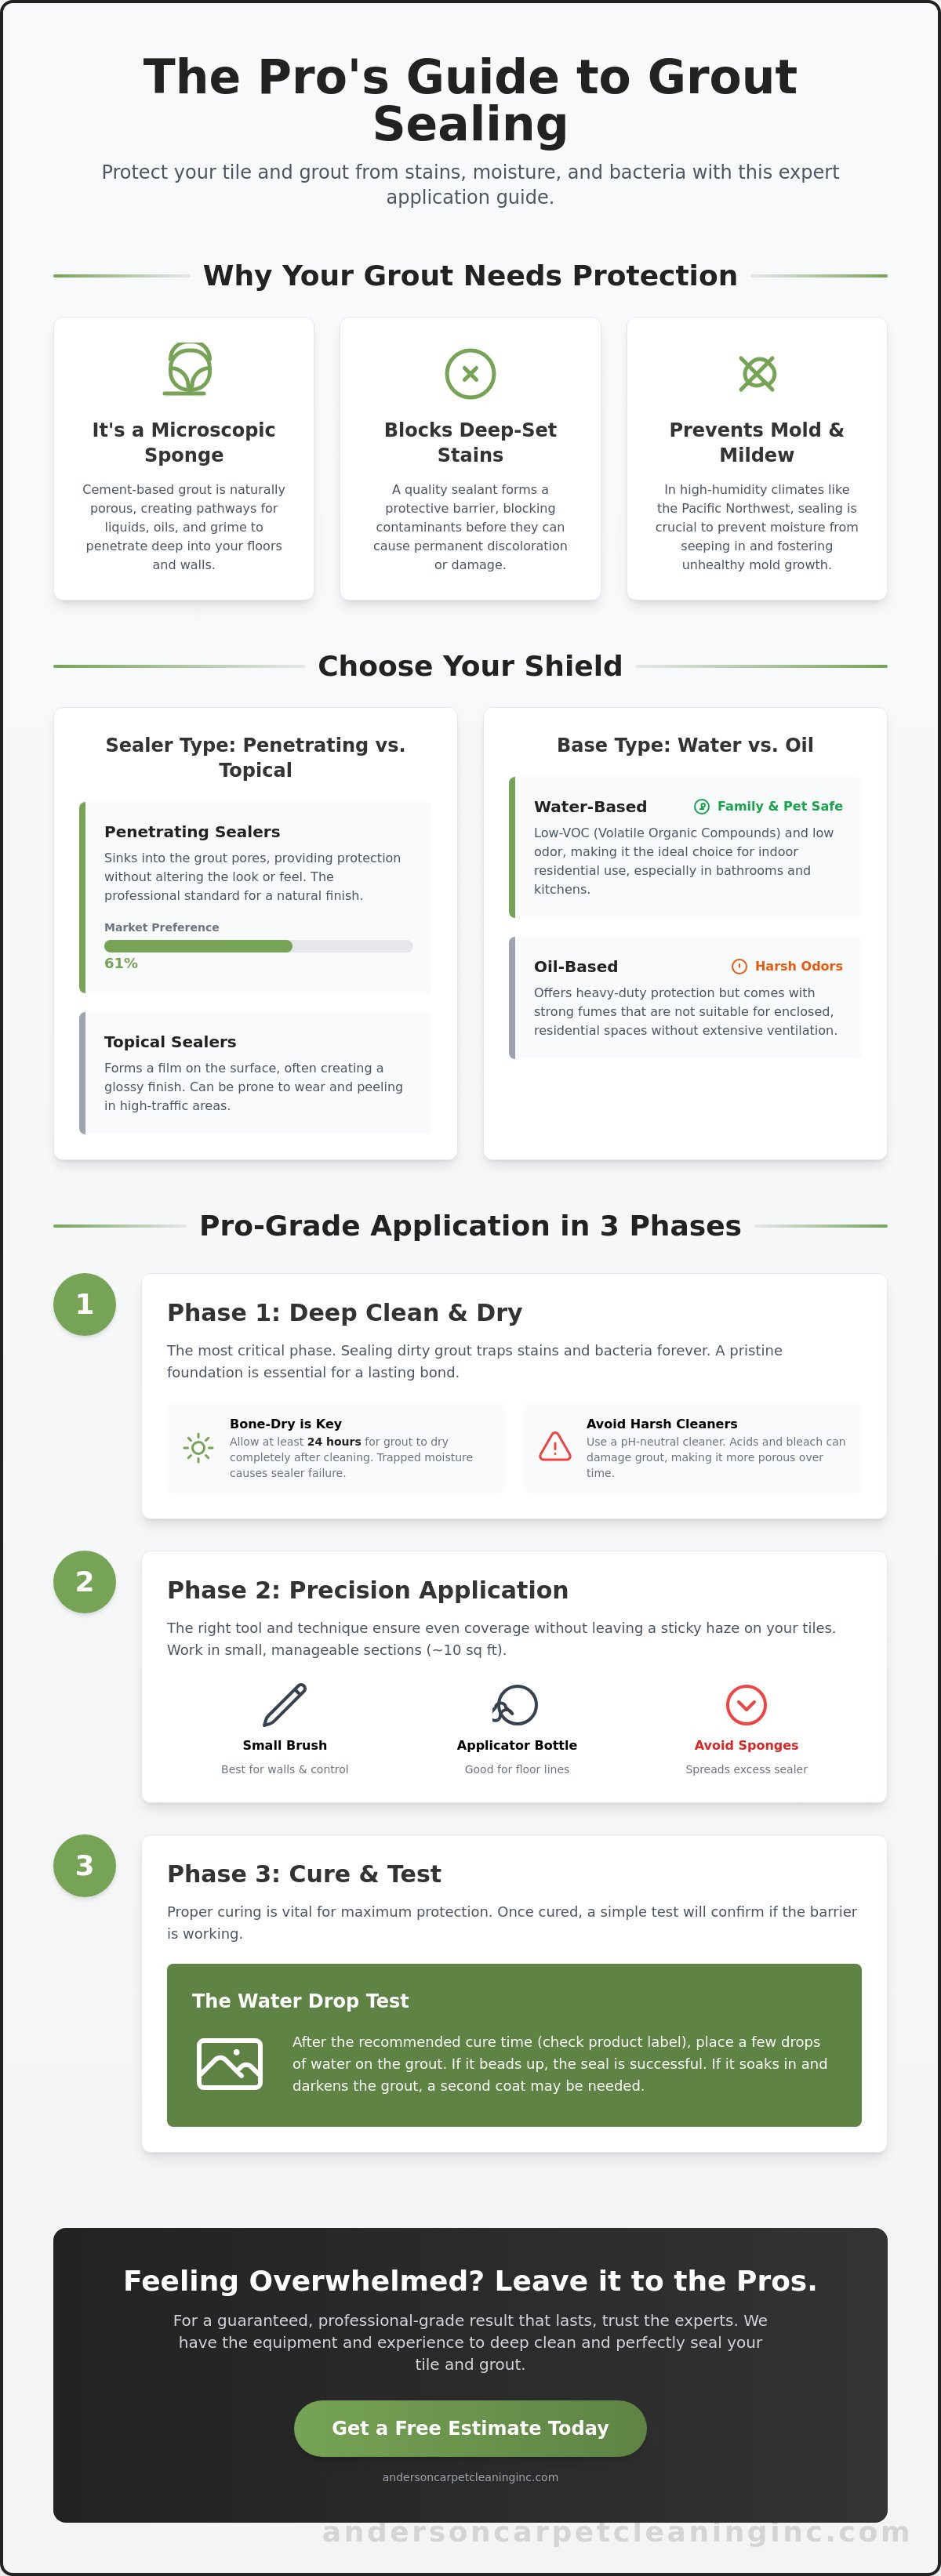
To understand why a grout sealant application is vital, we first need to look at the material itself. What is Grout? In its most common form, it's a porous mixture of water, cement, and sand used to fill the spaces between tiles. Because it's cement-based, it acts as a microscopic doorway for liquids, oils, and grime to enter your floors. A high-quality sealant acts as a protective barrier, penetrating these pores to block out contaminants before they can cause permanent damage or discoloration.
Living in the Pacific Northwest creates a unique set of challenges for homeowners. In cities like Seattle and Bellevue, our high humidity levels and frequent rainfall accelerate grout decay. Moisture doesn't just sit on the surface; it seeps into the grout lines, leading to stubborn mold and mildew growth that's difficult to remove. Proper sealing creates a water-beading effect, ensuring that dampness stays on top of the surface where it can be easily wiped away.
There's a critical rule every homeowner should follow: never seal dirty grout. This is the most common mistake we see in the industry. Sealing over stains or bacteria effectively locks them in place forever, making professional restoration much harder later. Before starting any grout sealant application, ensure the area has undergone a deep, restorative cleaning to preserve the health and beauty of your home environment.
The Science of Porosity: Why Grout Absorbs Stains
Grout is essentially a microscopic sponge that requires a specialized chemical barrier to remain sanitary and liquid-resistant. Without this protection, unsealed grout lines become a haven for bacteria, food particles, and allergens, which can compromise the indoor air quality of your family's living spaces.
Choosing the Right Sealant for Your Surface
Selecting the right product depends on your tile type and desired aesthetic. Penetrating sealers are the preferred choice for a natural look, as they soak into the grout without changing its appearance. Topical sealers sit on top and provide a glossy finish, though they can be more prone to wear in high-traffic areas. For residential homes, we often recommend water-based sealers because they are low-VOC and safer for your family and pets. While oil-based options offer heavy-duty protection, they often come with harsher odors that aren't ideal for enclosed bathrooms.
- Natural Stone: Requires high-quality penetrating sealers to prevent deep staining in the stone's own pores.
- Ceramic and Porcelain: These tiles are often non-porous, so the focus remains entirely on protecting the grout lines between them.
Step-by-Step Guide to Professional-Grade Grout Sealing
Achieving a flawless grout sealant application requires patience and meticulous attention to detail. In our damp climate, moisture is your biggest enemy during this process. If you're working in Bothell or Redmond, you might need to run high-powered fans for several hours before you begin. Grout must be bone-dry to the touch; otherwise, the sealer won't penetrate the pores properly and will simply sit on the surface, leading to premature failure.
Phase 1: Deep Cleaning and Drying
Before you apply a single drop of sealer, your grout lines must be free of oils, soaps, and hidden dirt. We recommend using a pH-neutral cleaner to protect the structural integrity of the cement. Harsh acids or bleach can etch the surface and make it more porous over time. For many homeowners, starting with a professional tile and grout cleaning is the best way to ensure a perfectly sanitized foundation. Once the cleaning is finished, allow the area to dry completely for at least 24 hours to ensure no trapped moisture remains.
Phase 2: Precision Application and Curing
The right tool makes the difference between a messy floor and a professional finish. A small brush offers the most control for vertical shower walls, while a specialized roller applicator is more efficient for large floor areas. Avoid using a large sponge; it often spreads too much liquid onto the tile face, which can lead to a stubborn haze. Work in small, manageable sections of about 10 square feet at a time to maintain control.
Apply the liquid evenly along the grout line without saturating the surrounding tile. Within 10 minutes, you must perform the critical "wipe-back" phase. Use a clean, dry microfiber cloth to buff away any excess sealer from the tile surface. If it dries on the tile, it can leave a sticky residue that is difficult to remove without specialized solvents. After your grout sealant application is complete, the curing process begins. Avoid heavy foot traffic for 24 hours and keep the area completely dry for 72 hours to allow the bond to fully set. If you'd prefer to leave this technical work to the experts, our team offers specialized tile and grout cleaning services designed to restore and protect your surfaces for years to come.
Maintenance and When to Call a Seattle Specialist
Your hard work during the grout sealant application pays off through consistent, gentle maintenance. To ensure your barrier remains effective against the damp Seattle air, perform the Water Drop Test every 6 to 12 months. Simply place a few drops of water on various grout lines in high-traffic areas like your kitchen or bathroom. If the water beads up on the surface, your protection is intact; if it disappears into the pores, it's time for a new coat to prevent moisture from reaching the subfloor.
Protecting this seal requires the right cleaning approach. Many homeowners in Bellevue and Redmond reach for vinegar or bleach, but these acidic and harsh alkaline cleaners actually strip away the protective layer you just applied. Stick to pH-neutral cleaners to maintain the health of your home environment and the longevity of your grout. When surface grime becomes too stubborn for a standard mop, high pressure steam cleaning offers a level of restoration that household tools simply cannot match. Truck-mounted systems use regulated heat and vacuum power to extract contaminants from deep within the grout without damaging the surrounding tile.
Signs Your Grout Needs Professional Restoration
Sometimes, basic maintenance isn't enough to save aging surfaces. If you notice persistent odors, crumbling material, or permanent dark staining that won't budge despite your best efforts, your grout may have reached the end of its lifespan. Consulting a Seattle tile expert is essential when these signs appear. Specialists in our region understand how local humidity affects porous materials and can provide the specific chemical treatments needed for Pacific Northwest homes.
The Longevity of Professional Sealants
While DIY products are convenient, commercial-grade sealants used by professionals often last up to five times longer than standard hardware store versions. These high-performance formulas bond more effectively at a molecular level, providing superior resistance to oils and moisture in busy households. Whether you are in Bothell or downtown Seattle, investing in professional-grade protection means fewer applications and better peace of mind. Schedule your professional tile and grout evaluation with Anderson today to ensure your home stays beautiful and healthy for years to come.
Long-Term Protection for Your Home's Surfaces
Protecting your home's tile surfaces is an investment in both lasting beauty and a healthy living environment. By mastering the nuances of a proper grout sealant application, you've taken a vital step toward preventing deep-seated mold and structural moisture damage. Remember that the "clean-first" rule is your foundation; maintaining that barrier with pH-neutral care will keep your kitchen and bathrooms looking pristine for years to come.
At Anderson Carpet Cleaning, we've spent over 25 years as a family-operated business serving our neighbors throughout the Greater Seattle area. We utilize advanced truck-mounted steam extraction technology and eco-friendly, non-toxic solutions that are completely safe for your pets and children. We don't just perform a service; we restore your peace of mind by ensuring your home remains a clean, vibrant sanctuary for your family.
Protect your floors with a professional tile and grout cleaning and sealing quote today!
Your home deserves the highest level of care, and we look forward to helping you keep your surfaces sparkling and protected.
Frequently Asked Questions
How long does grout sealant take to dry in the Seattle climate?
Grout sealant typically takes 2 to 4 hours to become dry to the touch, but the high humidity in the Seattle area often extends the full curing time. You should wait at least 24 hours before allowing foot traffic and 72 hours before exposing the area to moisture. Using a dehumidifier or fans helps stabilize the environment and ensures the bond sets correctly despite our local dampness.
Can I apply new grout sealer over old sealer?
You can apply new sealer over an existing layer only if the old product has worn away and the grout lines have been deeply cleaned. If the previous sealer is still intact, the new application won't be able to penetrate the pores, leaving a sticky residue on the surface. We suggest performing a water test first; if the water doesn't soak in, the old sealer is still protecting your floors.
Is it better to use a spray or a brush for grout sealant application?
A brush or specialized roller is generally superior to a spray for a precise grout sealant application. While sprays are faster for large areas, they often saturate the tile surface and lead to more waste and cleanup. Using a brush allows you to work the sealant directly into the porous grout lines, ensuring deep penetration and a more consistent protective barrier without the risk of over-spraying.
What happens if I don't wipe the sealer off the tile quickly enough?
If you leave excess sealer on the tile face for more than 10 to 15 minutes, it will dry into a stubborn, cloudy haze. This residue is often difficult to remove once it hardens and may require specialized solvents to clean without damaging the tile. Working in small sections ensures you can buff away any liquid from the non-porous tile surfaces before it begins to cure. This ensures your grout sealant application remains effective and invisible.


